Claremont Designs


Leave a comment

Clean, Rotate, Cut, Glue

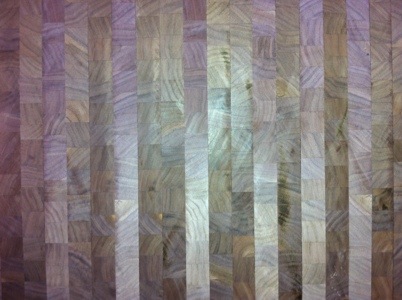
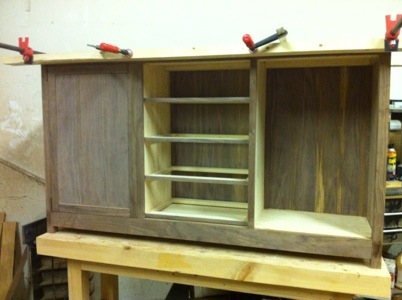
Started the day by taking yesterday’s glued up sections and cleaning them up. Basically that was a combination of jointer and sander work to get the panels to look like the photo below.

20120624-180030.jpg

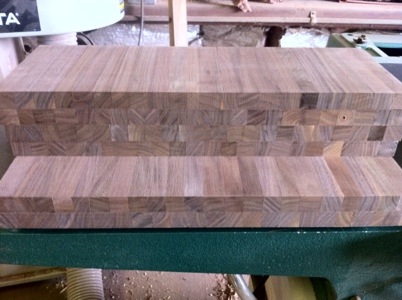
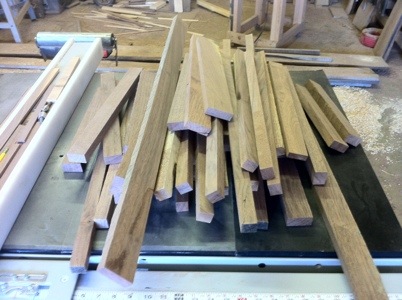
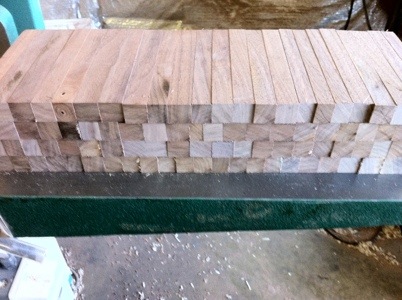
The process from there is to basically run these blanks through the table saw to cut the final end grain strips. The 7 blanks I made yesterday yielded 51 strips of end grain. The first photo shows them lined up. The problem is that to get the best look you need to randomize the pattern. This is basically a process of putting them in random order and rotating some strips 180 degrees. Ultimately that leaves you with a more pleasing panel like in the bottom photo. Currently the top is in 4 big pieces. After then next shop visit the top should be finished.

20120624-180126.jpg

20120624-180144.jpg


Leave a comment

Butcher’s Layout

There is an inordinate amount of gluing required to put together an end grain butcher block. I’m about half way through today’s gluing exercise. In the picture are about 15% of the pieces in the top. They are all rotated 90 degrees so that it is easier to grab, glue, rotate, glue, put in place, and then repeat on the next piece. You’ve got to move quickly so that the glue doesn’t dry too much before you reach the last piece in the line. Hopefully they dry pretty straight so that I don’t have to do as much cleanup work in the morning.

20120623-155444.jpg


Leave a comment

Start of Butcher Block Top

Below is the messy beginnings of the butcher block top to a coffee table. The first picture shows the scrap lumber that I’m using for the top. It’s great to see it find another home other than more iPad styluses (although I’m sure there will be a few pieces leftover for me to throw on the lathe). The work on the top starts by getting the pieces all to a common thickness and length (I don’t care about the other dimensions at this point). The first pass of this work is shown in the second picture where the pieces are laid out prior to glue up. Hopefully I can get the initial glue up completed before calling it a day today.

20120623-124903.jpg

20120623-124915.jpg


Leave a comment

Cleaning the Iron

It certainly doesn’t look like much in the photo, but the table saw is considerably cleaner now than just a few minutes earlier. It probably took close to an hour to get the table saw, jointer and planer clean. I don’t know that it will help me cut any straighter or work any safer or faster, but it was worth it for the peace of mind alone. I followed up the cleaning exercise with dimensioning some legs from a piece of 8/4 walnut. No pictures of the table legs included in this post (not too exciting to look at – and this is coming from the guy that posted a picture of sawdust in a Dixie cup a few weeks ago). Lots of shop work for the coming weekend. Hopefully the clean cast iron will make all of the difference.

20120622-193642.jpg


Leave a comment

Glue and Sawdust

Despite the hours I will spend trying to remove any trace of glue from the surface of a finished piece, glue mixed with sawdust is a tremendous help. In the small Dixie cup pictured below is walnut sawdust from a first pass at sanding the dresser / buffet. When blended together with glue and inserted in small gaps in the furniture it is great at hiding flaws. It would have been better if I had done a little better at fitting the pieces in the first place, but this is a great plan B.

20120602-215211.jpg


Leave a comment

Such Is Life

Only had a little time in the shop before needing to run off to lunch so I figured that I would turn a quick pen out of mahogany. Unfortunately the wood chipped out at the last minute on the barrel on the left. Rather than trash the whole thing I decided to make one of the smallest styluses ever. With the added thickness in the middle it’s actually pretty comfortable despite the very short length.

20120602-133011.jpg

20120602-133020.jpg


Leave a comment

Proper Fitting

I feel like I’ve been writing about a proper fitting on this piece forever… At least I’ve knocked out a bunch of other projects while working on this one. This time I really mean that I’m onto fitting. Currently in clamps are the final structural elements of the cabinet. The studs from yesterday stiffened up the piece enough that I can avoid the hidden 5th leg. I could probably finish up all of the fitting today, but with temperatures near 90 degrees and no ac or moving air in the shop, that activity will have to wait until next weekend.

20120527-140343.jpg


Leave a comment

Stiffening Up

The span from one end to the other of this cabinet is pretty long. As a result the center section supporting all of the drawers was sagging about 3/8 of an inch. To stiffen it up a bit, I’ve installed some studs attached to the bottom rails to support the bottom. Hopefully that will fix things up. If not I’ll have to add a small center leg to support the bottom. You would never notice it unless you were on your hands and knees, but I still hope to avoid adding it.

On a positive note, two new brushes were able to revive the planer. And while I was in maintenance mode, I finally replaced the busted plug on the table saw…

20120526-210012.jpg


Leave a comment

RIP Delta 22-580 – Updated…

Unfortunately it’s time to put my planer out to pasture. She helped me dimension some walnut highlights for a cabinet this morning. After lunch she just wouldn’t start again. It’s possible that Delta’s authorized finest might be able to restore life, but it looks like this old friend is headed for Craig and his list… I’m basically shut down until her replacement is found.

Update: I should have noted a long time ago that I got the planer working once again… 2 replacement brushes and everything is working again. I see that people view this post every now and then, so I thought I should update.

20120519-160247.jpg


Leave a comment

Mother’s Day Work

Spent Mother’s Day in the shop. None of these pieces are for her though (sorry Mom). Most of the day was spent between assembly, sanding and fit work. The tall cherry piece in the photo below was the dry fit of the back part of the new cabinet I’m working on. The four corners of the piece feature through dovetails. The back is a panel about 1/16th of an inch thick. The wood for the panel is from the same pieces used to make the sides of the cabinet. My cherry stock was pretty thick, so I resawed it to get the backs and the sides out of the same piece of lumber. The walnut piece below is in the middle of being fit for the 4 drawers in the center section of the piece. Little more fit work on the drawers and doors next week and then this one will be ready for finishing…

20120513-192647.jpg

20120513-192657.jpg