Claremont Designs


Leave a comment

Laying Out for a Birdseye Maple Edison Lamp

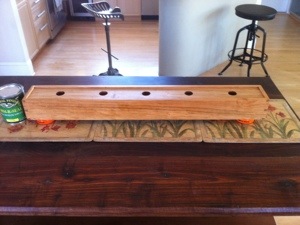
I’m in the early stages of creating another long Edison lamp, but this time get to try some birdseye (or bird’s eye – you choose) maple for the work. It costs a bit more, but it is considerably more interesting than stock maple.

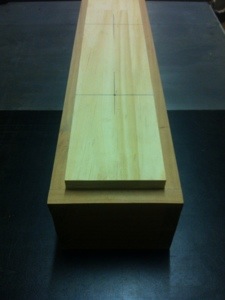
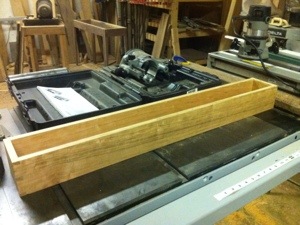
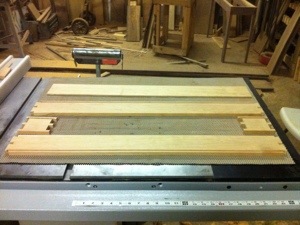
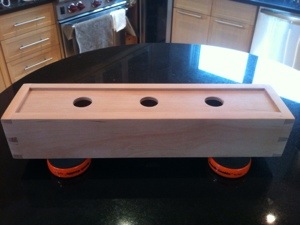
In the series of photos below I’ve shown the front of the box after dimensioning the lumber. For the front of the box and the sides I always try (doesn’t always happen) to get those 3 pieces out of one piece of lumber. In most cases that allows the grain of the wood to flow around the piece. In this case it is less about the grain and more about the location of the eyes.

The “easy” part of the project is over. Next up are the dovetails and the groove for the light top. The dovetails aren’t too hard, but I can’t tell you how many times routing that groove on the router table has forced me to mill up an extra side piece. Hopefully a little patience and planning will pay dividends here.

20121201-154314.jpg

20121201-154326.jpg


Leave a comment

Spalted Walnut Dovetailed Edison Lamp Base

On a quick trip to the shop post Thanksgiving, I started work on yet another Edison lamp. I had a small piece of spalted walnut in the shop. It wasn’t really big enough to incorporate into any other piece, so I thought I would see how it would look as a lamp base. It might ultimately end up being too busy in the final design, but I wanted to give it a shot. The photo below shows a partial dry fit after I cut the dovetails. This one shouldn’t take long to finish from here.

20121125-220826.jpg


Leave a comment

36″ Edison Lamp Approaching the Finish Line

Getting close to finishing up the next Edison lamp. As with the last few small pieces, I’ve started finishing items at home. It’s more efficient for applying multiple coats of finish (compared to driving 45 miles each way to the shop). Plus the temperature and humidity are much better for finishing in my condo. The picture below was taken right after the first coat was applied. It will probably take at least 2 more coats of finish with 4 aught steel wool in between. The next post on the blog should have the finished lamp photos…

20121113-172640.jpg


Leave a comment

Prepping the Long Edison Base

In the last workshop session it was all about getting the base ready for light fixtures. You would think building the dovetailed box would be the hard part, but I’ve always found it more difficult to space and line up the light fixtures. I decided to try a new approach this time. In the first picture you’ll see that I’ve inserted the board that holds the sockets into the top of the base. I’ve then laid out for the 5 sockets. At this point I’ve drilled a small pilot hole through both boards at the same time. I then went back and used this pilot hole to drill the larger holes needed for the socket openings and the brass nipple that the sockets attach to. In the second photo I’ve begun the wiring for the lamp. A little more fit and sanding work to be done. Then it’s off to finishing.

20121109-124345.jpg

20121109-124356.jpg


Leave a comment

Lengthy Edison Lamp

I started working on another variation of the Edison lamps I’ve been building. Per a customer request this one will be about 36″ wide (I had been building them around 18″ wide so far). I wasn’t sure how it would look at first, but after the original dry fit I’m liking the proportions.

It is big enough though that I needed to use some of my standard stock (I like to build these out of leftover lumber or from some repurposed lumber). So no interesting lumber story to go along with this piece. I was however able to get all of the pieces out of one piece of lumber. It may not sound like a big deal, but by getting all of the lumber from one board I don’t really have to worry about the cherry matching in tone. Prior to planing the box pieces to thickness, I was able to resaw the stock for the 1/4″ thick top. This resulted in the box pieces being a fraction of an inch thinner than I usually build, but it definitely doesn’t ruin the look (it actually gives me some more options when it comes to the dovetails).

In the 2 photos below you can see my initial dry fit and all of the pieces awaiting the initial glue-up. I should be sanding up and working on the wiring on the next shop trip.

20121104-210140.jpg

20121104-210216.jpg


Leave a comment

Cherry Edison Lamp Finishing

Getting close to finishing the cherry Edison lamp base. I was able to get all of the sanding and cleanup of the base completed at the shop this weekend. The first picture below shows the base without any finish on it. The picture doesn’t really do it justice, but there is a nice natural redness to the piece. The second photo shows it with one coat of finish applied. I’ll add at least two more coats before calling this one finished. Over time cherry will continue to darken (especially with exposure to natural light).

20121002-110309.jpg

20121002-110320.jpg


Leave a comment

Edison Dry Fit (part 2)

Started building another Edison lamp in the shop this weekend. The first one I made was made from walnut. This time I’m recycling some cherry that I have in the shop. The lumber was used in the first table I ever built. Unfortunately back then I didn’t have all of the tools I do now. As a result, not all of the boards were as flat as I like them. Eventually the wood kept moving to the point that it needed to be rebuilt. Fortunately I’ve been able to reuse almost all of that lumber. In the picture below I did a quick dry fit of the box to come up with a good assembly strategy. It’s now sitting in clamps and hopefully it can get to the finishing room soon.

20120929-200405.jpg


Leave a comment

Clamping the Gate

Finally back to the shop for some weekend work. Between business travel and the start of college football and NFL, the time has been somewhat limited. It does look like UVA is trying to convince me that staying home to watch games on Saturdays is a waste of my time.

In the picture below I’m starting the clamping for the gate leg table. It looks simple, but is actually a little more challenging than anticipated. The clamped piece in the photo only extends about half the length of the apron. As a result I need enough force to keep the tenon fully seated in the mortise in the leg, but there can’t be so much pressure that the piece wants to bow. For the piece to look nice and function well, it is important that this half of an apron is tightly joined to the full apron that was previously clamped up. For now everything looks good, but we’ll see how we’ll it dried the next time I get to the shop. This was the last assembly step for the gate leg table, so the next trip should include sanding and a first coat of finish.

20120924-104136.jpg


Leave a comment

Building a Wooden Hinge

Shown in the series of photos below is the construction of the wooden hinge that makes the gate leg table work. It may not be obvious on a quick glance, but the table base here has 6 legs. The 4 outside legs are fixed, but the interior leg on each side swings open (like a gate) to support one leaf of the table. In the first photo I was laying out the pieces to get accurate dimensions. Measurements and plans are great (I use them), but sometimes it is easier or more accurate to just layout the pieces and mark the cuts. The second photo shows the apron with the initial cuts for the hinge. Finally I transferred some layout lines and identified where to drill the through hole that receives a dowel (to allow the leg to swing open). The final photo shows a dry fit of the piece with the leg partially open. You’ll notice that I had to add a couple of relief cuts to actually allow for the leg to pivot freely. Time for glue up and then on to finishing. As always I’ve reverted to using the table saw as my workbench.

20120826-215300.jpg

20120826-215310.jpg

20120826-215321.jpg


Leave a comment

From Table Saw to Bar

This will officially be the last post on this piece that gets categorized as WIP. I wasn’t happy with the finish quality I was getting in my poorly lit shop with no climate control. Wish I had those things, but that’s money I don’t have. So I’ve moved the piece form the table saw to the bar / island in my kitchen. Unfortunately this is forcing me to relocate for this evening’s sazerac. Also you might notice every woodworker’s nightmare in the background… Yes that is a very nice kitchen I have, but why did they use IKEA cabinets? I can’t tell you a company that I like less from a furniture quality perspective… Sorry. Back on topic… Hopefully I’ll have the coffee table glamour shots on the blog by tomorrow.

20120808-215129.jpg