Getting close to finishing the cherry Edison lamp base. I was able to get all of the sanding and cleanup of the base completed at the shop this weekend. The first picture below shows the base without any finish on it. The picture doesn’t really do it justice, but there is a nice natural redness to the piece. The second photo shows it with one coat of finish applied. I’ll add at least two more coats before calling this one finished. Over time cherry will continue to darken (especially with exposure to natural light).
Author Archives: Aldag
Edison Dry Fit (part 2)
Started building another Edison lamp in the shop this weekend. The first one I made was made from walnut. This time I’m recycling some cherry that I have in the shop. The lumber was used in the first table I ever built. Unfortunately back then I didn’t have all of the tools I do now. As a result, not all of the boards were as flat as I like them. Eventually the wood kept moving to the point that it needed to be rebuilt. Fortunately I’ve been able to reuse almost all of that lumber. In the picture below I did a quick dry fit of the box to come up with a good assembly strategy. It’s now sitting in clamps and hopefully it can get to the finishing room soon.
Clamping the Gate
Finally back to the shop for some weekend work. Between business travel and the start of college football and NFL, the time has been somewhat limited. It does look like UVA is trying to convince me that staying home to watch games on Saturdays is a waste of my time.
In the picture below I’m starting the clamping for the gate leg table. It looks simple, but is actually a little more challenging than anticipated. The clamped piece in the photo only extends about half the length of the apron. As a result I need enough force to keep the tenon fully seated in the mortise in the leg, but there can’t be so much pressure that the piece wants to bow. For the piece to look nice and function well, it is important that this half of an apron is tightly joined to the full apron that was previously clamped up. For now everything looks good, but we’ll see how we’ll it dried the next time I get to the shop. This was the last assembly step for the gate leg table, so the next trip should include sanding and a first coat of finish.
Building a Wooden Hinge
Shown in the series of photos below is the construction of the wooden hinge that makes the gate leg table work. It may not be obvious on a quick glance, but the table base here has 6 legs. The 4 outside legs are fixed, but the interior leg on each side swings open (like a gate) to support one leaf of the table. In the first photo I was laying out the pieces to get accurate dimensions. Measurements and plans are great (I use them), but sometimes it is easier or more accurate to just layout the pieces and mark the cuts. The second photo shows the apron with the initial cuts for the hinge. Finally I transferred some layout lines and identified where to drill the through hole that receives a dowel (to allow the leg to swing open). The final photo shows a dry fit of the piece with the leg partially open. You’ll notice that I had to add a couple of relief cuts to actually allow for the leg to pivot freely. Time for glue up and then on to finishing. As always I’ve reverted to using the table saw as my workbench.
Finished Butcher Block Coffee Table
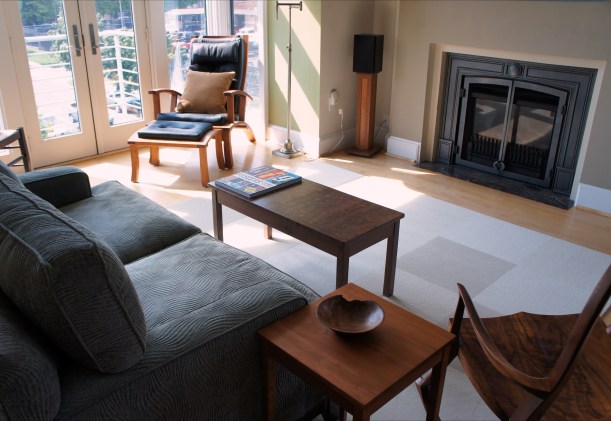
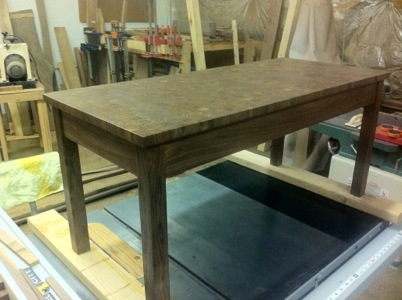
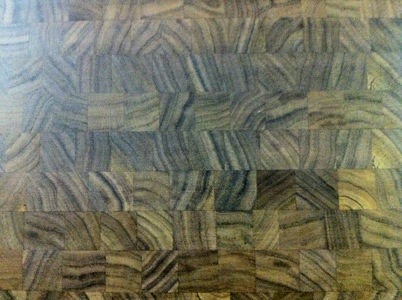
So it’s finally completed. After a final coat of finish last night, it is now ready to go. It’s not a huge coffee table, but perfect for a tiny place. And it is suitable for being used by you and your neighbor as long as you like each other. I chose not to do a close up of the end grain for the photos; there are plenty of other posts on this blog where you can see that detail (and you can see the detail if you go to full resolution views of the photos below). Since it was finished here in the “showroom” I just took a couple of quick shots in my living room to give you an idea as to scale and finish.
Also included in the photos are a small cherry end table, a turned bowl, and my favorite rocking chair. I’m capable of producing the first 2 of those items in my little shop, but in this case these were all made in Maine when I spent a week doing the customer in residence program at Thos. Moser. That was a great experience. My only regret is that I wished I would have picked a simpler piece to make (so that I would have learned some new techniques as opposed to every last thing you would ever want to know about sanding). You can also see their lolling chair hanging out by the window. The carpet is modern mix by flor. And the coffee table book featured here is a collection of concert posters (organized by designer) from the guys that run gig posters.
From Table Saw to Bar
This will officially be the last post on this piece that gets categorized as WIP. I wasn’t happy with the finish quality I was getting in my poorly lit shop with no climate control. Wish I had those things, but that’s money I don’t have. So I’ve moved the piece form the table saw to the bar / island in my kitchen. Unfortunately this is forcing me to relocate for this evening’s sazerac. Also you might notice every woodworker’s nightmare in the background… Yes that is a very nice kitchen I have, but why did they use IKEA cabinets? I can’t tell you a company that I like less from a furniture quality perspective… Sorry. Back on topic… Hopefully I’ll have the coffee table glamour shots on the blog by tomorrow.
Need To Make Some Room In Here
This piece is ready for one final coat of finish. Unfortunately my table saw has become my finishing table… I need to finish some of these other half finished pieces. They have all been occupying my work tables for far too long now. The shop was a little warm today (100+ degrees but only about 55% humidity), so today saw little work other than the final coats of finish being applied. This one should be heading back up to DC tomorrow.
End Grain – Take 1
Finally almost time to call the butcher block coffee table done. Finished all sanding and got a first coat of finish on the table. The picture is a close up of the end grain after the first coat of finish. Please note that this is actually end grain butcher block as opposed to all of those companies advertising their tops as butcher block (but they don’t bother to expose the end grain). It can still look good that way, but it looks more like a bowling alley lane than a butcher’s block. The proper way should have the end grain exposed as it is easier on the butcher’s knives.
Butcher Base Dry Fit
A long business trip to Indonesia has resulted in this project taking a few weeks longer than anticipated to finish. In the picture below is the dry fit of the coffee table base. When working solo it is great to practice with the clamps before adding glue to the mix. This one was fairly straightforward thankfully. It should be dry by the morning. Then it’s only sanding and finishing left.
Final Butcher Assembly
It took a while (about 3 trips to the shop), but it’s finally time to put the top together. In the picture below are the 4 sub assemblies I made on the prior trip to the shop. At this point they have made numerous trips through the planer to get them flat and equal thickness. Normally I would have done this mostly with my wide belt drum sander, but it was almost 100 degrees outside and my shop doesn’t have AC (so speed was of the essence). After this point in the process I jointed one edge of each piece and cut a parallel side with the table saw. To do the final assembly, I used biscuits to help keep the tops of the pieces flush. On my next visit to the shop we’ll see how well that worked…


